A guide to installing Cordova on Windows 10
Please note that this guide was last updated on 30th May 2017. I haven’t worked with Cordova since 2018 and so the steps below are likely out of date and may not work. I’m keeping the guide here as a historical reference. If you are interested in providing updated instructions, please reach out to me and I will look to update this post accordingly.
This is the second part of a guide to installing the Cordova framework, and deals with installation on Windows 10. If you own a Mac, see part one instead.
Prerequisites
To follow through this guide you’ll need:
- A computer running Windows 10.
- An Android device, plus a USB cable to connect it to your compiuter.
A few notes
iOS
Unfortunately you need a Mac to build an app for an iOS device. This guide will therefore include instructions for Android only.
32-bit vs 64-bit Windows
This guide assumes you are running 64-bit Windows. If you don’t know what version you are running, it will almost certainly be 64-bit.
If you think you might be running a 32-bit install, then you should use the 32-bit installation files below. Wherever you see 64 bit, substitute this for 32 bit.
If you are in any doubt, or want to double check, follow these instructions:
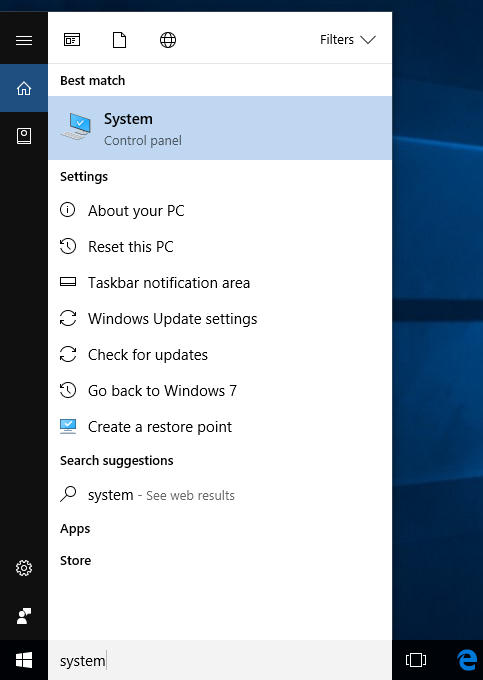
- Select the Search box in the bottom left hand corner of the screen.
- Type system then select the System item.
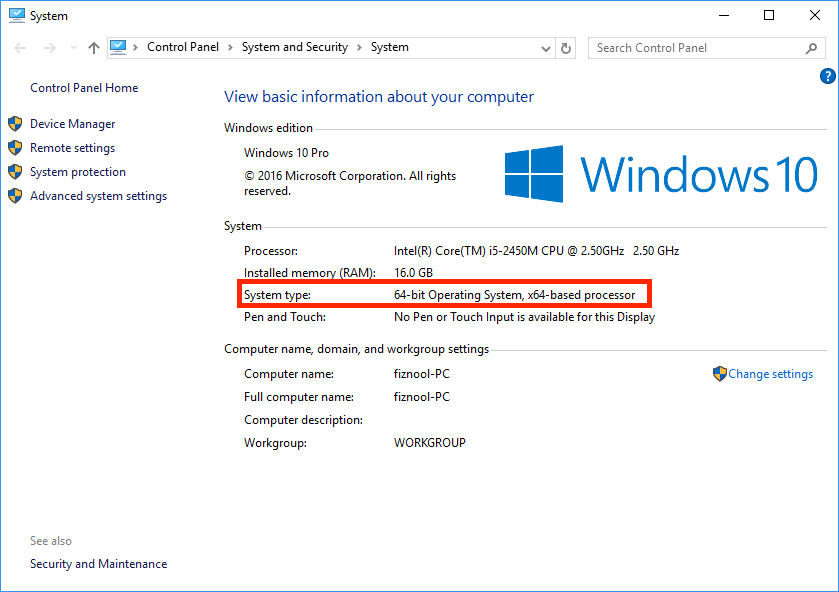
The System type field will show the version of Windows you are running.
Steps
Briefly, these are steps you need to take:
- Install the Git for Windows terminal application
- Install and configure the Android SDK
- Install the Cordova CLI and create a sample app
- Deploy to the Android emulator
- Deploy to your device
1) Git for Windows
The Git for Windows terminal is a superior alternative to the built-in Windows console application. We’ll be using it to run terminal commands.
To install:
- Browse to the Git for Windows homepage.
- Select the big Download button.
The appropriate file should be downloaded. Once it has, double click to open and follow through with the installer, using all of the default options.
2) Android SDK
The Android SDK is used to build Android apps. There are a few steps involved to get the Android SDK:
- Install Java
- Install the Android command line tools
- Install the Android SDK
We’ll cover these steps now.
Installing Java
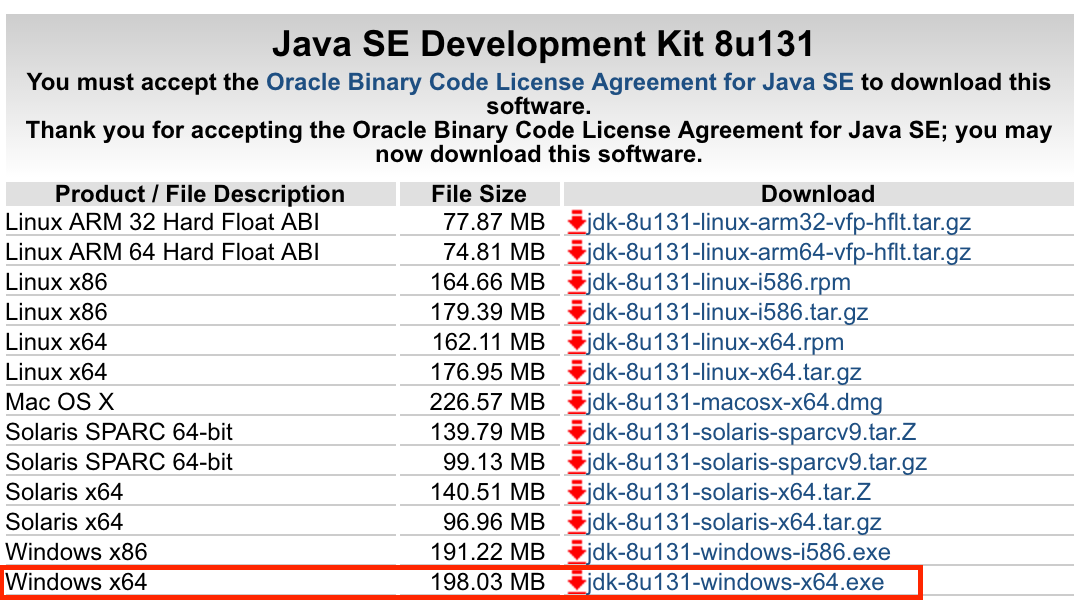
- Go to the Java download page.
- After accepting the license agreement, choose the Windows x64 file under the Java SE Development Kit section to begin the download.
- Once the
.exefile has downloaded, open it. - Double click on the package installer icon. The Java installer should appear - click through to install Java.
To check that Java was installed correctly, open a terminal window and type java -version. You should see the Java version printed to the terminal.
Installing the Android command line tools
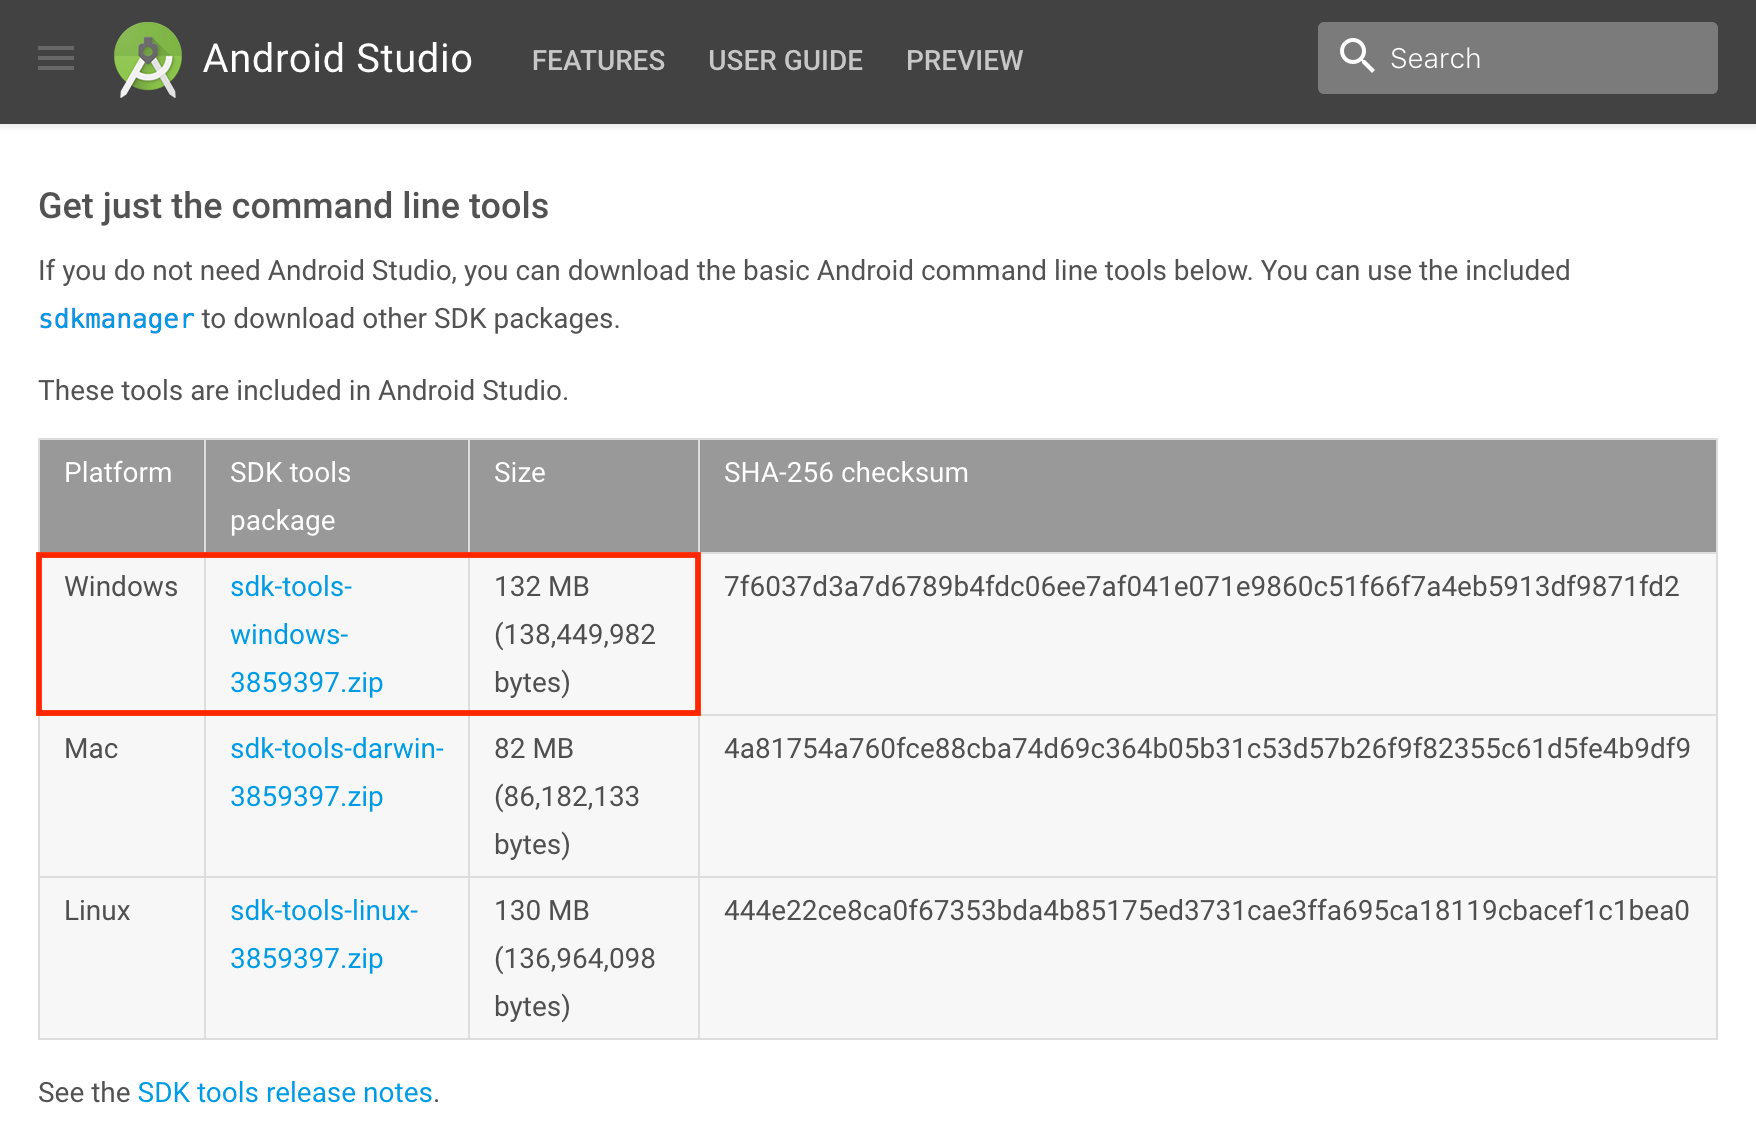
- Go to the Android SDK Command Line tools installation page.
- Click on the zip file for the Windows platform to download the tools to your computer.
- When it has finished downloading, open the Windows File Explorer.
- Navigate to the
C:\drive folder. You should see a few folders here, includingProgram Files. - Create a new folder in the
C:\drive namesandroid. - Unzip the downloaded file to this new folder. This will take a few minutes.
When you are done, you should have a new folder at C:\android\tools.
Installing the SDK
We’ll now use the Command Line tools to install the SDK and other necessary tools.
- Open the Git Bash app.
- Type the following commands:
cd C:/android/tools/bin
./sdkmanager.bat "build-tools;25.0.3" "emulator" "extras;intel;Hardware_Accelerated_Execution_Manager" "platforms;android-25" "platform-tools" "system-images;android-25;google_apis;x86" --verbose
./avdmanager.bat -v create avd -n x86 -k "system-images;android-25;google_apis;x86" -g "google_apis"
Make sure to accept the license agreement. Once these commands have completed, your android folder should contain a whole bunch of new directories, including:
build-tools- these are the tools used by Cordova to build your Android app.emulator- this is the Android emulator that will be used later to preview the app on your computer.platforms- this is the Android SDK, separated by platform version. These correspond to the releases of Android: Nougat, Marshmallow, etc. The command above has downloaded the most recent platform version (25).platform-tools- more tools that are used to administer Android devices on the command line.system-images- these are images used by the emulator.
Installing Gradle
Gradle is a tool that is required by the Android SDK to build Android apps. It used to be included with the Android SDK, but now it must be downloaded and configured manually.
- Go to the gradle releases page.
- Find the
binary-onlyversion of the latest release and select it to begin the download.
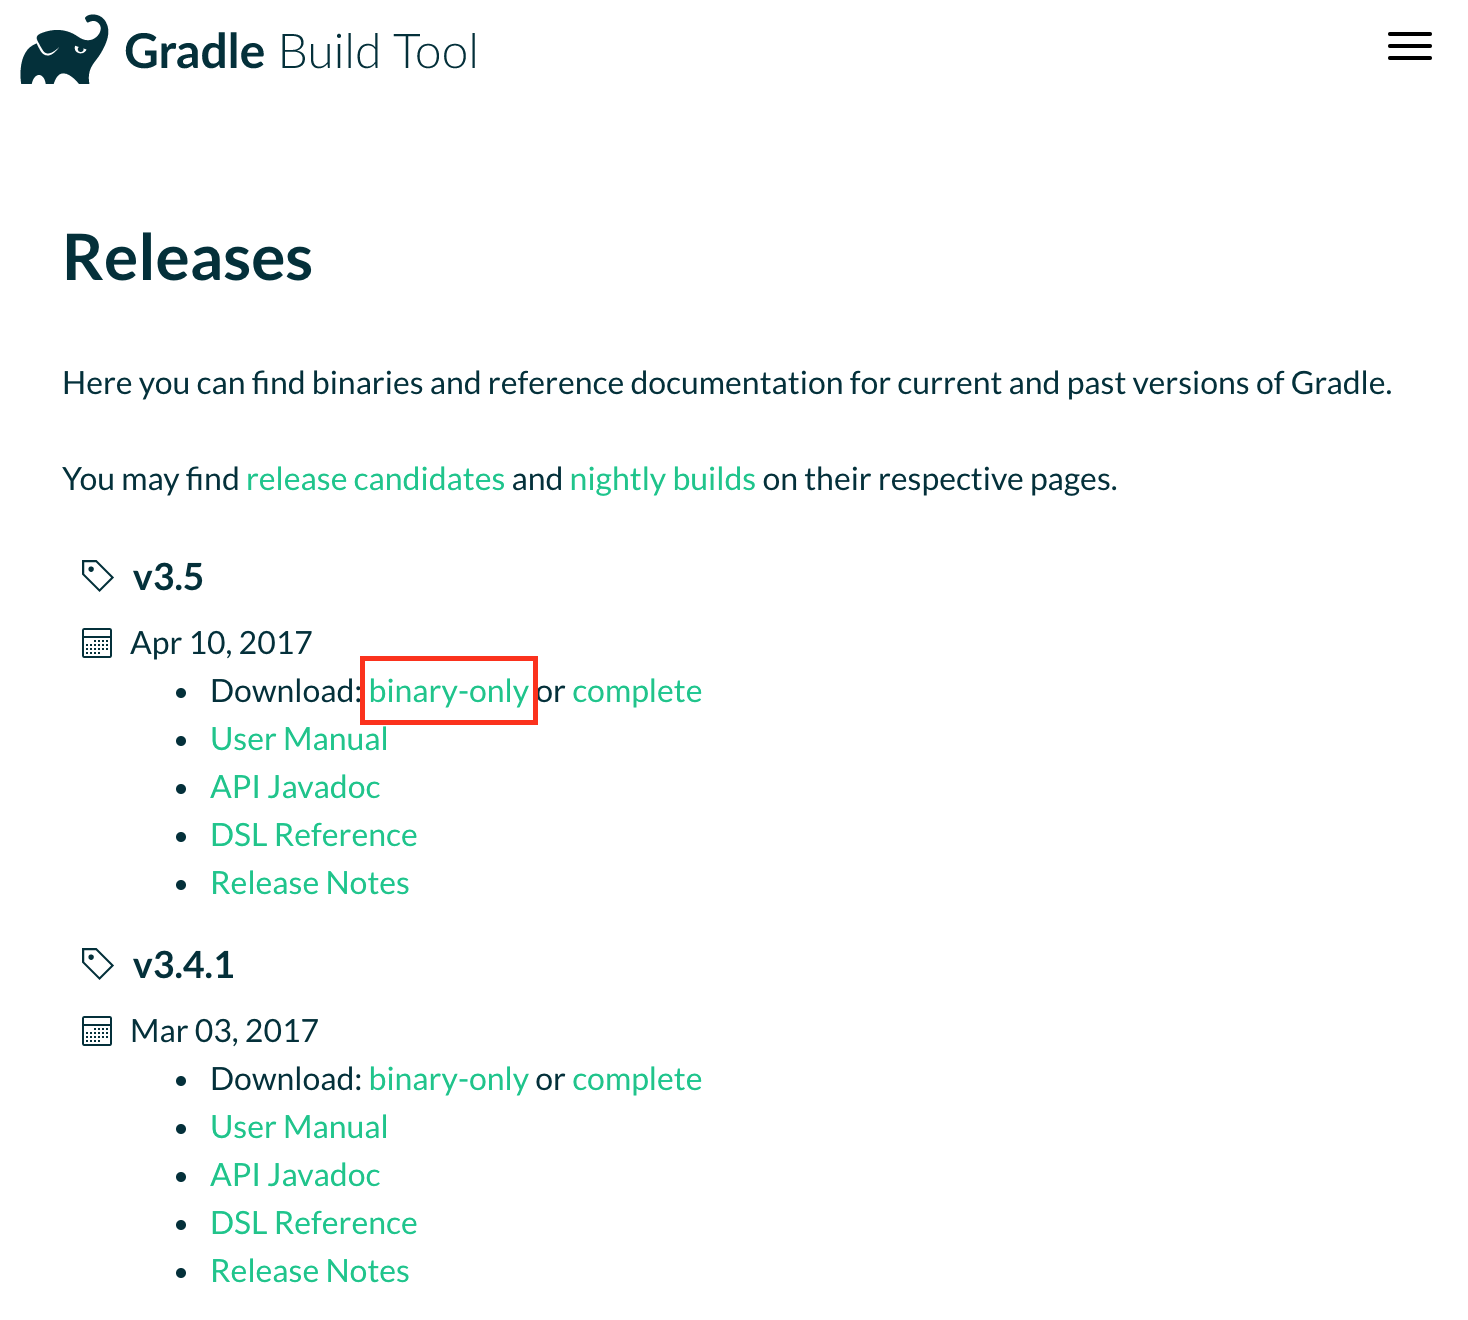
- When the download has finished, unzip the file.
- Rename the resulting folder to just
gradle. - Move this
gradlefolder to theandroidfolder that was created above.
Configuration
In order to make this dizzying array of tools available to Cordova, and to us when using Git Bash, we need to set some environment variables. To do this:
- Select the Search box in the bottom left hand corner of the screen.
- Type environment then select Edit the system environment variables.

- The System Properties pane will appear. Select the Environment Variables… button.
We need to set three environment variables in total.
1) JAVA_HOME
- Under the System variables section, click the New… button.
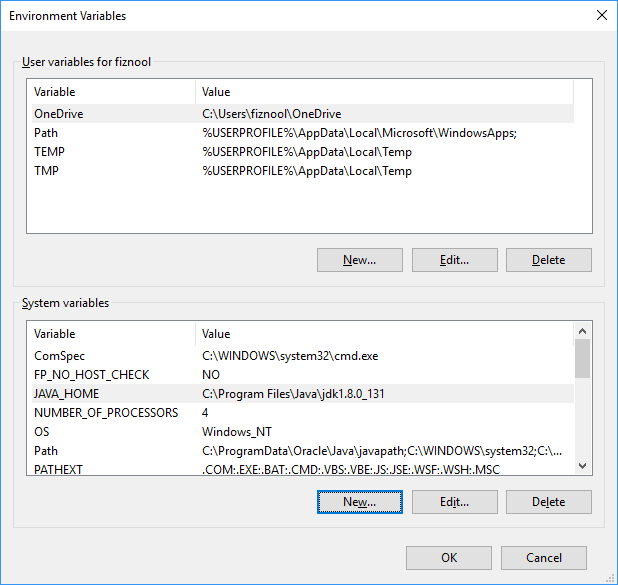
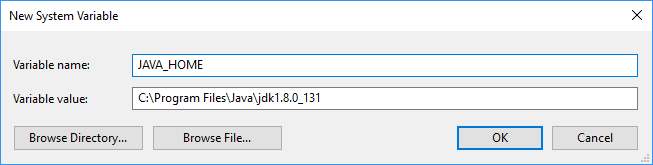
- In the Variable Name box, type
JAVA_HOME. - Select the Browse Directory button. In the resulting folder browser pane, expand This PC -> WINDOWS (C:) -> Program Files -> Java and choose the folder beginning with
jdk. Select OK. - Your new environment variable should resemble the following:
- Select OK to create the environment variable.
2) ANDROID_HOME
- Under the System variables section, click the New… button.
- In the Variable Name box, type
ANDROID_HOME. - In the Variable Value box, type
C:\android. - Select OK to create the environment variable.
3) Path
- Select the
Pathitem under the System variables section and click the Edit… button. You should see a pane named Edit environment variable. - Using the New button, add the following four items to the list:
%ANDROID_HOME%\emulator
%ANDROID_HOME%\gradle\bin
%ANDROID_HOME%\platform-tools
%ANDROID_HOME%\tools\bin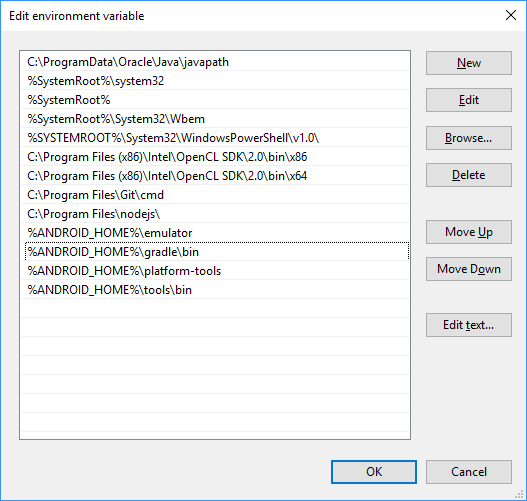
- Click OK and then OK again to close the panes.
To test that all of this has worked, try typing the following into the terminal window:
adb version
gradle -v
After running each command, you should see the respective tool print its version number. If any of these commands results in a command not found, the environment has not yet been setup correctly. Please double check that the above steps have been carried out before continuing.
Next Step
If you have got this far, congratulations! We have now set up the Android SDK. The next step is to install the Cordova CLI and create a sample app.
4) Install the Cordova CLI
Install node.js
The Cordova CLI requires node.js. If you have already installed node, you can skip to the next section.
Otherwise:
- Go to the node.js download page.
- Click on the ‘Windows Installer’ box to download the LTS version of node for Windows.
- When the file has downloaded, click on it to run the installer.
- When it has finished, close and re-open Git Bash and type
node -v. Node should print out its version number.
Install Cordova
- In a Git Bash window, type
npm install -g cordova. This command may take a few minutes to complete. There may be nothing printed to the window for a short while - be patient, it is working!
When this finished, you should be able to run the command cordova -v which should print the cordova version to the terminal.
Create a sample app
We’ll now create a sample app which we can deploy to the emulator and device.
Open Git Bash and change to a folder where you are happy for code to live. The commands below will generate a new cordova project in a subdirectory of whichever folder you are currently in.
For example, if you have code living in folders at C:\Users\<username>\Code, change to this directory before running the commands below.
Once you are in the correct directory, run the following:
cordova create cordova-hello-world
cd cordova-hello-world
cordova platform add android
cordova build
These commands will create a new cordova project, add the Android platform, and build the respective files for deployment to Android. It might take a while!
Note: you may need to click through to allow various programs access to restricted parts of the system, such as the firewall.
Before continuing, please ensure that the commands above all worked correctly, with no errors. If there were any errors, you’ll need to go back and check that the Android SDK was installed correctly, and that you’ve set the environment variables correctly.
5) Deploy the sample app to the emulator
Before deploying to the emulator, there’s more stuff to install.
- Open the File Explorer.
- Browse to the folder
C:\android\extras\intel\Hardware_Accelerated_Execution_Manager. - Double click on the file
intelhaxm-android.exeand run through the installer.
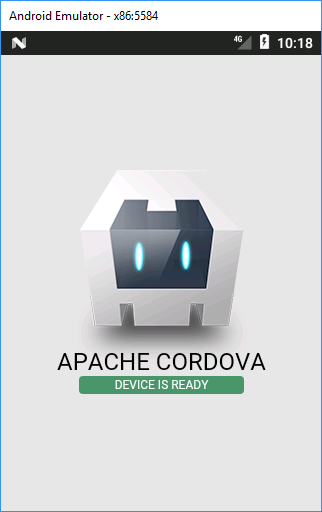
Now we can deploy the app to the Android emulator. In the Git Bash window, type:
cordova emulate androidIf all is well, the emulator should launch and display the app:
Note: If you see an error in the terminal such as Intel virtualization technology (vt,vt-x) is not enabled when the emulator is starting, this means that your computer may not support the Android emulator. If you know how to access your computer’s BIOS, you can try to enable Hardware Virtualization. Otherwise, don’t worry about it - we’ll deploy to a real device instead.
6) Deploy the sample app to your device
If you have an Android phone or tablet running Android 4.4+, you can deploy the app to your device. You’ll need a USB cable to connect your device to your computer.
To begin, you need to configure your device to accept deployments from your computer:
- Open the Settings app on your device.
- Scroll to the bottom of the list and tap About phone or About tablet.
- Scroll to the bottom of the list and find the Build number item.
- Tap on the Build number item seven times. This will enable a new menu item Developer Options in the main Settings app.
- Go back to the Settings app and tap on the new Developer Options item. You should see a screen resembling the following:
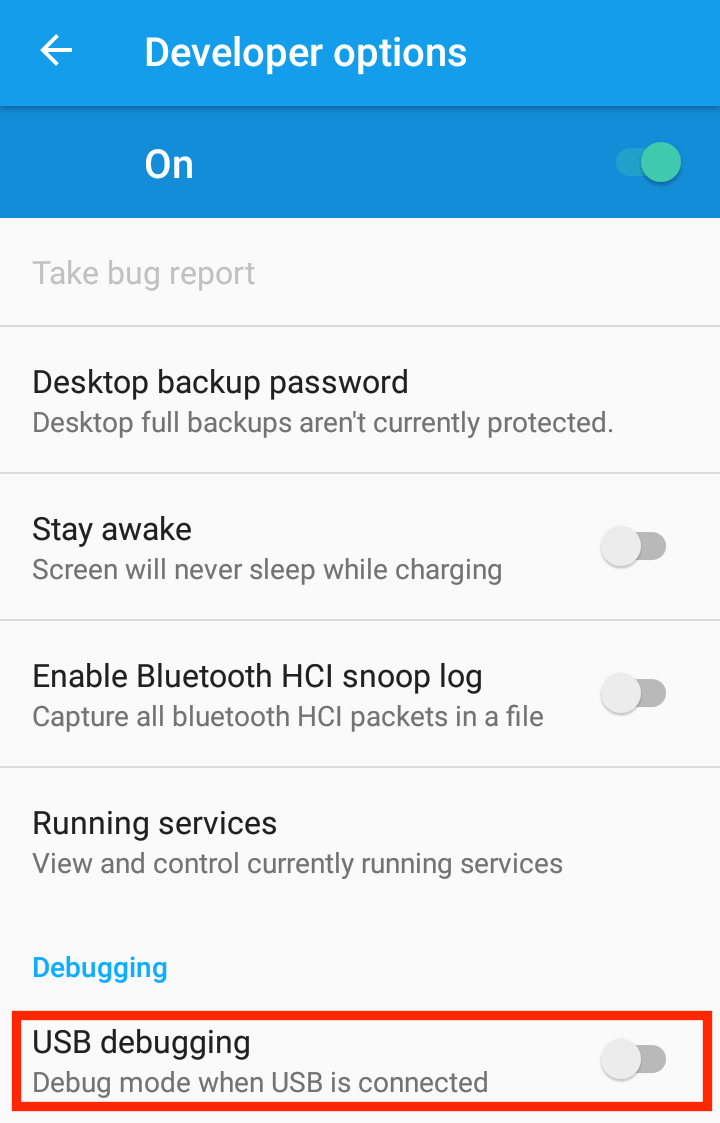
- If not enabled, tap the toggle switch to enable ‘Developer Mode’.
- Scroll down and find the item ‘USB Debugging’ and tap the toggle switch to enable USB Debugging.
Your device can now accept app deployments from your computer.
To continue:
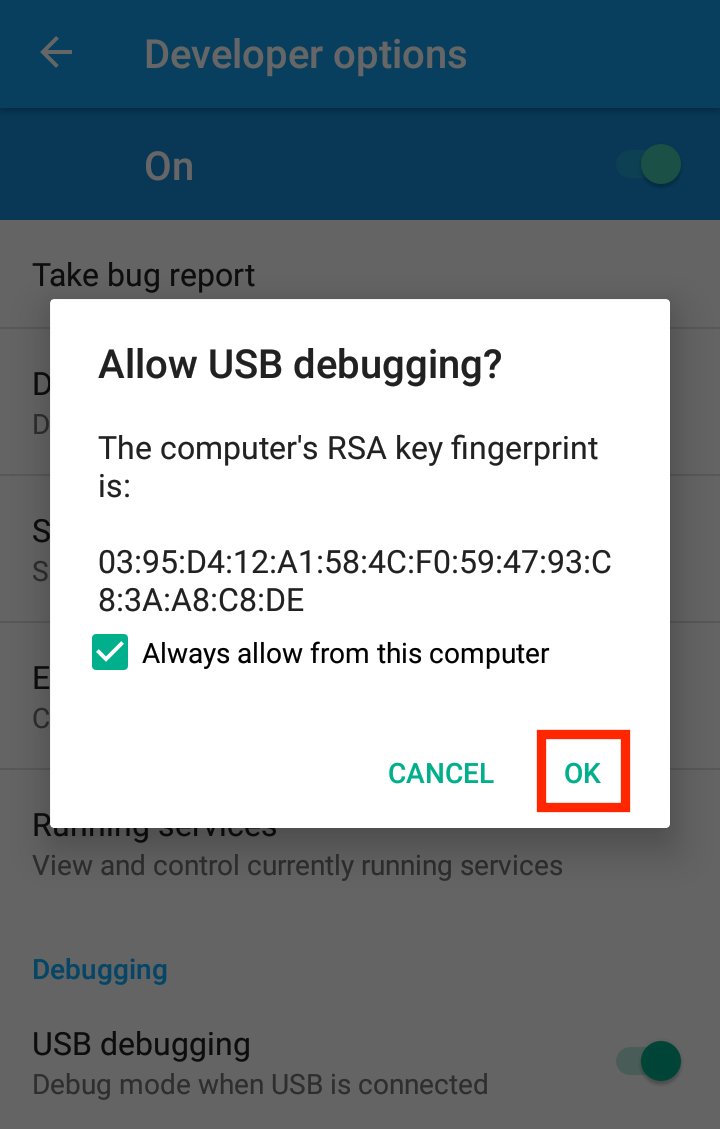
- Ensure your device is unlocked.
- Connect your device to your computer with the USB cable.
- You should see a message to ‘Allow USB Debugging’. Check the ‘Always allow from this computer’ checkbox and tap ‘OK’.
- Open a Git Bash window and type
adb devices. You should see your device listed as attached in the terminal.
You can now deploy the app to your device:
- In the terminal, type:
cordova run androidAfter a short while, the app will be deployed and automatically opened on your device.
Next Steps
You’ve now got Cordova installed, configured and running on your computer, and you are able to deploy apps to the simulators and devices. You’re in good shape!
I’d recommend taking a look at the Ionic Framework, which builds on Cordova by providing a set of platform-specific UI components and additional build tools to help you build an awesome hybrid mobile app.